Biscoff Cookie Butter Cookies – Soft Chewy Obsession
Biscoff cookie butter cookies are more than just a treat; they’re a ticket to pure, unadulterated bliss. If you’ve ever found yourself captivated by the irresistible swirl of creamy Biscoff spread, then prepare to be utterly delighted. These aren’t your average cookies; they’re an ode to that beloved cookie butter flavor, transformed into a soft, chewy, melt-in-your-mouth masterpiece. What makes these Biscoff cookie butter cookies so special is the perfect marriage of textures and tastes. The rich, caramelized notes of the cookie butter are amplified by the crisp edges and tender centers of the cookie, creating a harmonious symphony of sweetness. They’re wonderfully easy to whip up, making them perfect for a spontaneous craving or a thoughtful homemade gift. Get ready to fall head over heels for these incredible Biscoff cookie butter cookies – they’re a game-changer!”

Biscoff Cookie Butter Cookies
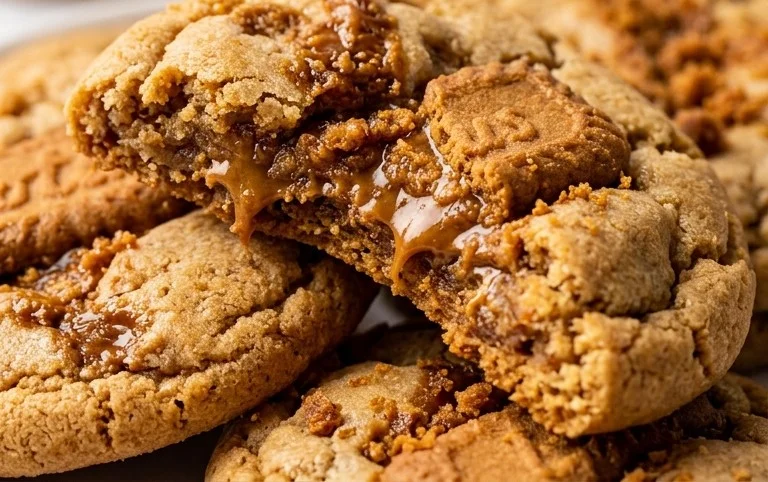
There are few things more comforting than a warm, freshly baked cookie. And if you’re a fan of that irresistible spiced cookie flavor and creamy, spreadable goodness, then these Biscoff Cookie Butter Cookies are about to become your new obsession. This recipe takes the beloved Biscoff cookie spread and transforms it into a soft, chewy cookie that’s packed with even more Biscoff flavor. The magic happens when you incorporate cookie butter directly into the dough, creating an incredibly tender crumb and a rich, caramel-like sweetness. We’ll also be adding a final touch of melted cookie butter and a sprinkle of flaked salt to elevate these beyond your average cookie. Get ready to impress yourself and anyone lucky enough to share these with you!
Ingredients:
- 13 teaspoons Biscoff cookie butter
- ½ cup butter (room temperature)
- ½ cup Biscoff cookie butter
- ½ cup brown sugar
- ⅓ cup granulated sugar
- 1 large egg (room temperature)
- 2 teaspoons vanilla extract
- ½ teaspoon baking soda
- ½ teaspoon salt
- 1½ cups all-purpose flour
- 2 tablespoons Biscoff cookie butter (for drizzling on top)
- Flaked salt (for sprinkling on top)
Instructions:
-
Prepare the Dough Base
Begin by creaming together your softened butter and the ½ cup of Biscoff cookie butter in a large mixing bowl. Ensure your butter is truly at room temperature – this is key for a smooth, homogenous mixture. You want it to be soft enough to indent easily with your finger, but not melted. Use an electric mixer on medium speed to beat them together until they are light and fluffy, with no visible streaks of butter or cookie butter. This usually takes about 2-3 minutes. This step is crucial for incorporating air into the dough, which will contribute to the cookies’ tender texture. Next, add in the brown sugar and granulated sugar. Continue mixing until well combined and the mixture is smooth and creamy. Scrape down the sides of the bowl as needed to ensure everything is incorporated.
-
Incorporate Wet Ingredients and Leavening
Now it’s time to add the egg and vanilla extract. Crack the large egg into the bowl and add the vanilla. Mix on low speed until just combined. Be careful not to overmix at this stage, as it can lead to tougher cookies. Once the egg is incorporated, it’s time to add the dry ingredients. In a separate medium bowl, whisk together the all-purpose flour, baking soda, and salt. This ensures that the leavening agent (baking soda) and salt are evenly distributed throughout the flour, preventing any pockets of bitterness or uneven rising in your cookies. Gradually add the dry ingredients to the wet ingredients, mixing on low speed until just combined. Again, do not overmix! You should still see a few streaks of flour; this is perfectly fine and will be incorporated as you gently fold the dough.
-
Folding in the Cookie Butter Goodness
This is where the true Biscoff magic happens! Take your 13 teaspoons of Biscoff cookie butter. It’s helpful if it’s not straight from a super cold fridge, but if it is, a few seconds in the microwave (in a microwave-safe container, of course!) can soften it just enough. Gently fold this luscious cookie butter into the cookie dough. You want to create swirls and ribbons of cookie butter throughout the dough, rather than mixing it in completely. This will give you delightful pockets of concentrated Biscoff flavor and a wonderfully gooey texture in every bite. Use a spatula to gently incorporate it, being mindful not to overwork the dough. The dough will be soft and slightly sticky at this point.
-
Chilling and Shaping the Cookies
Cover the bowl with plastic wrap and refrigerate the dough for at least 30 minutes, and ideally for 1-2 hours. Chilling the dough is a very important step for several reasons. Firstly, it allows the flour to hydrate properly, which leads to a better texture. Secondly, it solidifies the fats in the dough, preventing the cookies from spreading too much and becoming flat during baking. This will help your cookies maintain a lovely thick, chewy center. Once the dough has chilled, preheat your oven to 350°F (175°C). Line baking sheets with parchment paper. Scoop rounded tablespoons of the chilled dough and roll them into balls. Place them about 2 inches apart on the prepared baking sheets. If you want an even more authentic look, you can gently press a few extra Biscoff cookies onto the top of each dough ball before baking.
-
Baking and Finishing Touches
Bake for 10-12 minutes, or until the edges are golden brown and the centers are still slightly soft. Don’t overbake! They will continue to set up as they cool. Remove the baking sheets from the oven and let the cookies cool on the sheets for 5 minutes before transferring them to a wire rack to cool completely. While the cookies are still warm on the baking sheet, melt the remaining 2 tablespoons of Biscoff cookie butter. You can do this in a small microwave-safe bowl in 15-second intervals, stirring between each, until smooth and drizzly. Drizzle the melted cookie butter over the tops of the warm cookies. Immediately sprinkle with flaked salt. The salt beautifully balances the sweetness of the cookies and enhances the Biscoff flavor. Let the drizzle set before serving. Enjoy these incredibly delicious Biscoff Cookie Butter Cookies warm or at room temperature!
Conclusion:
There you have it – a foolproof guide to creating the most delicious Biscoff Cookie Butter Cookies! These cookies are an absolute dream for anyone who adores the unique, spiced caramel flavor of Biscoff. They’re wonderfully tender on the inside with delightfully crisp edges, and that subtle hint of cookie butter throughout makes them truly irresistible. I love how simple they are to whip up, making them perfect for a last-minute treat or a weekend baking project. They’re incredibly versatile, too!
Serve these Biscoff Cookie Butter Cookies warm with a glass of milk for pure comfort, or cool them completely and use them as the base for decadent ice cream sandwiches. You could even dip half of them in melted chocolate for an extra touch of indulgence. Feel free to experiment with adding a sprinkle of sea salt on top before baking for a delightful sweet and salty contrast. I wholeheartedly encourage you to give this recipe a try; I promise you won’t be disappointed!
Frequently Asked Questions:
Can I make these cookies ahead of time?
Absolutely! These cookies store beautifully in an airtight container at room temperature for up to 3-4 days. They actually taste even better on the second day as the flavors meld together.
What if I can’t find smooth Biscoff spread?
Don’t worry! You can use crunchy Biscoff spread if that’s what you have. The cookies will have a slightly different texture with little bits of cookie in them, which is also delicious!
Can I freeze the cookie dough?
Yes, you can freeze the Biscoff Cookie Butter Cookies dough. Scoop the dough into balls and place them on a baking sheet lined with parchment paper. Freeze until solid, then transfer the dough balls to a freezer-safe bag or container. Bake directly from frozen, adding a few extra minutes to the baking time.
Biscoff Cookie Butter Cookies
Deliciously chewy cookies infused with the irresistible flavor of Biscoff cookie butter, with an extra drizzle and flakey salt topping.
Ingredients
-
13 teaspoons biscoff cookie butter
-
½ cup butter, room temperature
-
½ cup biscoff cookie butter
-
½ cup brown sugar
-
⅓ cup granulated sugar
-
1 large egg, room temperature
-
2 teaspoons vanilla extract
-
½ teaspoon baking soda
-
½ teaspoon salt
-
1½ cups all-purpose flour
-
2 tablespoons biscoff cookie butter, for drizzling
-
Flaked salt, for sprinkling
Instructions
-
Step 1
Cream together the softened butter and ½ cup of biscoff cookie butter in a large bowl until light and fluffy. -
Step 2
Add the brown sugar and granulated sugar and beat until well combined. -
Step 3
Beat in the egg and vanilla extract until incorporated. -
Step 4
In a separate bowl, whisk together the flour, baking soda, and salt. Gradually add the dry ingredients to the wet ingredients, mixing until just combined. -
Step 5
Stir in the 13 teaspoons of biscoff cookie butter. -
Step 6
Chill the dough for at least 30 minutes. Preheat oven to 350°F (175°C). Line baking sheets with parchment paper. -
Step 7
Roll dough into balls and place on prepared baking sheets. Bake for 9-11 minutes, or until edges are golden brown. -
Step 8
While cookies are still warm, melt the remaining 2 tablespoons of biscoff cookie butter and drizzle over the tops. Sprinkle with flaked salt.
Important Information
Nutrition Facts (Per Serving)
It is important to consider this information as approximate and not to use it as definitive health advice.
Allergy Information
Please check ingredients for potential allergens and consult a health professional if in doubt.