Cozy Pumpkin Chocolate Chip Muffins Easy Recipe
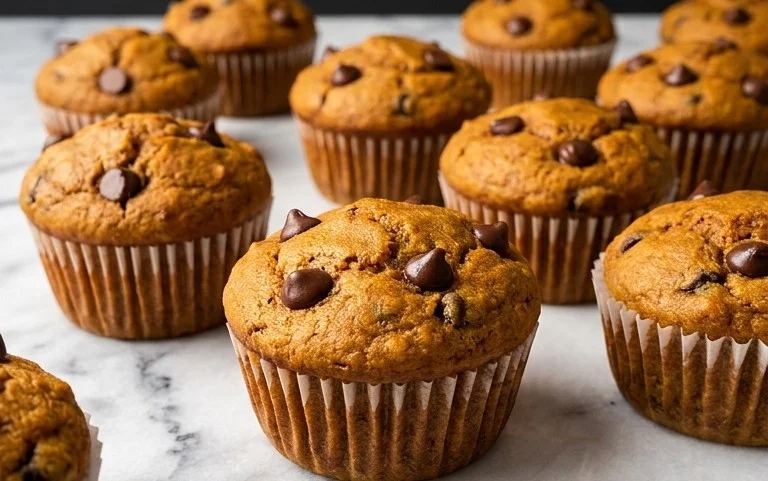
Pumpkin Chocolate Chip Muffins are more than just a breakfast treat; they’re a warm hug in edible form, a cozy invitation to savor the best of autumn. There’s a reason these fluffy delights are a perennial favorite. The comforting aroma that fills your kitchen as they bake is pure magic, a prelude to the delightful dance of sweet pumpkin and rich, melty chocolate. What makes these Pumpkin Chocolate Chip Muffins truly special is their perfect balance – moist and tender from the pumpkin puree, with those irresistible bursts of chocolate in every bite. They’re the ultimate pick-me-up on a chilly morning, a fantastic snack for little hands, and an even better accompaniment to a steaming cup of coffee or tea. Get ready to fall in love with fall all over again with this incredible recipe.
Pumpkin Chocolate Chip Muffins
There’s something incredibly comforting about a warm, freshly baked muffin, especially when it combines the cozy flavors of pumpkin and the irresistible sweetness of chocolate chips. These Pumpkin Chocolate Chip Muffins are the perfect treat for a crisp autumn morning, a delightful afternoon snack, or even a simple dessert. They’re incredibly easy to make, requiring no fancy equipment, just a few common pantry staples and a whole lot of deliciousness. The aroma that fills your kitchen as they bake is simply divine, a true testament to the season. I love making a batch of these on a weekend and having them ready for quick breakfasts or a pick-me-up throughout the week. The moist, tender crumb infused with pumpkin spice, studded with melty chocolate chips, is a winning combination that’s sure to please everyone.
Ingredients:
- 1 & 3/4 cups (220g) all-purpose flour
- 1 tsp baking soda
- 1 tsp ground cinnamon
- 1/2 tsp salt
- 1 cup (188g) semi-sweet mini chocolate chips
- 1/2 cup (125ml) vegetable oil
- 3/4 cup (150g) granulated sugar
- 1 cup (250g) canned pumpkin puree
- 2 large eggs
- 1/4 cup (60g) yogurt ((plain or vanilla flavor))
- 1 tsp vanilla extract
Cooking Instructions:
Get ready to create some muffin magic! This recipe is designed for simplicity and maximum flavor. We’ll start by preparing our dry ingredients, then move on to the wet ingredients, and finally bring them all together for baking.
Prepping the Muffin Tin and Dry Ingredients
Before you even think about mixing, it’s always a good idea to prepare your muffin tin. This ensures that your muffins bake evenly and don’t stick. You can either generously grease each cup of your muffin tin with butter or cooking spray, or, my personal preference for muffins, line them with paper liners. This makes for easy cleanup and helps create those lovely rounded muffin tops. Once your tin is ready, let’s combine all the dry ingredients in a medium-sized mixing bowl. Add the 1 & 3/4 cups (220g) of all-purpose flour, 1 teaspoon of baking soda (this is crucial for lift and a tender crumb), 1 teaspoon of ground cinnamon (the heart of our pumpkin spice flavor), and 1/2 teaspoon of salt (which balances out the sweetness and enhances all the other flavors). Whisk these together thoroughly to ensure the leavening agents and spices are evenly distributed throughout the flour. This prevents pockets of baking soda or uneven spice distribution in your finished muffins.
Mixing the Wet Ingredients
Now, let’s move on to the wet ingredients. In a separate, larger mixing bowl, combine the 1/2 cup (125ml) of vegetable oil with the 3/4 cup (150g) of granulated sugar. Whisk these together until they are well combined and the sugar begins to dissolve slightly into the oil. Next, add the star of the show: 1 cup (250g) of canned pumpkin puree. Make sure you’re using pure pumpkin puree and not pumpkin pie filling, as the latter contains added sugars and spices that will alter the recipe. Gently mix the pumpkin into the oil and sugar mixture. Then, crack in your 2 large eggs, one at a time, whisking well after each addition to fully incorporate them into the batter. For added moisture and a delightful tang, stir in 1/4 cup (60g) of plain or vanilla yogurt. The yogurt contributes to a wonderfully tender and moist muffin. Finally, add 1 teaspoon of vanilla extract for that classic warm flavor. Whisk everything together until you have a smooth, homogenous wet ingredient mixture.
Combining Wet and Dry Ingredients
This is where the magic truly happens! Now, it’s time to bring our dry and wet ingredients together. Create a well in the center of your dry ingredients and pour the entire wet ingredient mixture into it. Using a spatula or a wooden spoon, gently fold the ingredients together. The key here is to mix *just until combined*. Overmixing can develop the gluten in the flour, resulting in tough, chewy muffins instead of light and tender ones. You’ll still see some streaks of flour; that’s perfectly okay! Don’t be tempted to mix until it’s completely smooth. The goal is a slightly lumpy batter.
Adding the Chocolatey Goodness
Now for the best part – the chocolate chips! Gently fold in 1 cup (188g) of semi-sweet mini chocolate chips. I prefer mini chocolate chips because they distribute more evenly throughout the batter and melt beautifully into little pockets of chocolatey bliss. If you only have regular-sized chocolate chips, that’s fine too, just be aware that they might clump together a bit more. Again, mix just until the chocolate chips are distributed throughout the batter. It’s okay if there are a few dry spots; the chocolate chips will help coat them.
Filling and Baking the Muffins
Using a large spoon or a cookie scoop, evenly divide the batter among your prepared muffin cups, filling each one about two-thirds to three-quarters full. This allows enough room for the muffins to rise without overflowing. Place your muffin tin in a preheated oven at 375°F (190°C). Bake for approximately 18-22 minutes, or until a wooden skewer or toothpick inserted into the center of a muffin comes out clean. The baking time can vary slightly depending on your oven, so it’s always best to check a little earlier than the minimum time. You’ll know they’re done when they are golden brown on top and a toothpick inserted into the center comes out clean, with no wet batter attached. If there are just a few moist crumbs, they’re ready.
Cooling and Enjoying Your Delicious Muffins
Once baked, remove the muffin tin from the oven and let the muffins cool in the tin for about 5-10 minutes. This allows them to set up a bit more before you attempt to remove them. After this initial cooling period, carefully transfer the muffins to a wire rack to cool completely. Allowing them to cool on a wire rack ensures that air can circulate around them, preventing the bottoms from becoming soggy. These Pumpkin Chocolate Chip Muffins are absolutely divine served warm, but they also keep wonderfully at room temperature for a few days. You can store them in an airtight container. Enjoy every moist, spicy, chocolatey bite!

Conclusion:
There you have it – a foolproof recipe for the most delicious Pumpkin Chocolate Chip Muffins you’ll ever bake! These muffins are wonderfully moist, bursting with warm pumpkin spice, and studded with decadent chocolate chips. They’re the perfect treat for a crisp autumn morning, a comforting afternoon snack, or even a sweet breakfast on the go. I love how versatile they are; they pair beautifully with a steaming mug of coffee or a cold glass of milk.
I truly encourage you to give this recipe a try. It’s surprisingly simple, even for beginner bakers, and the results are incredibly rewarding. Don’t be afraid to experiment with variations – adding a sprinkle of cinnamon sugar on top before baking or even a handful of chopped walnuts can elevate these already fantastic muffins to another level. So grab your pumpkin puree, your favorite chocolate chips, and get ready to fill your kitchen with the irresistible aroma of these freshly baked delights!
Frequently Asked Questions:
Can I use fresh pumpkin puree instead of canned?
Absolutely! If you have fresh pumpkin on hand, you can roast and puree it yourself. Just ensure you drain off any excess liquid to maintain the correct batter consistency for your Pumpkin Chocolate Chip Muffins.
How should I store these muffins?
Once cooled, these muffins can be stored in an airtight container at room temperature for up to 3 days, or in the refrigerator for up to a week. For longer storage, wrap them individually and freeze them for up to 3 months.
Can I make these muffins vegan or gluten-free?
Yes, with a few simple substitutions! For vegan muffins, you can use a flax egg or applesauce as an egg replacer and plant-based milk. For gluten-free, a good quality gluten-free all-purpose flour blend will work well.
Pumpkin Chocolate Chip Muffins
Delicious and moist pumpkin chocolate chip muffins, perfect for any occasion.
Ingredients
-
1 & 3/4 cups (220g) all-purpose flour
-
1 tsp baking soda
-
1 tsp ground cinnamon
-
1/2 tsp salt
-
1 cup (188g) semi-sweet mini chocolate chips
-
1/2 cup (125ml) vegetable oil
-
3/4 cup (150g) granulated sugar
-
1 cup (250g) canned pumpkin puree
-
2 large eggs
-
1/4 cup (60g) plain yogurt
-
1 tsp vanilla extract
Instructions
-
Step 1
Preheat oven to 375°F (190°C). Line a 12-cup muffin tin with paper liners or grease well. -
Step 2
In a large bowl, whisk together the flour, baking soda, cinnamon, and salt. -
Step 3
In a separate bowl, whisk together the vegetable oil, granulated sugar, canned pumpkin puree, eggs, yogurt, and vanilla extract until well combined. -
Step 4
Pour the wet ingredients into the dry ingredients and stir until just combined. Do not overmix. -
Step 5
Gently fold in the semi-sweet mini chocolate chips. -
Step 6
Divide the batter evenly among the prepared muffin cups, filling each about two-thirds full. -
Step 7
Bake for 18-22 minutes, or until a toothpick inserted into the center of a muffin comes out clean. -
Step 8
Let the muffins cool in the tin for a few minutes before transferring them to a wire rack to cool completely.
Important Information
Nutrition Facts (Per Serving)
It is important to consider this information as approximate and not to use it as definitive health advice.
Allergy Information
Please check ingredients for potential allergens and consult a health professional if in doubt.